

With all the pressure on Thanksgiving day, cooking the perfect, juiciest, mouth watering Thanksgiving turkey can be as easy as popping it in the oven and knowing with absolute certainty that at the exact time you plan your meal your turkey will be done. And your turkey will be the most tender, moist and succulent turkey you and your family and guests have ever tasted!
Thanksgiving turkey is now the big hit at our house where before it was always the other great recipes on the table. Why? Because turkey is usually dry. Why? Because they're usually overcooked. Now you'll learn how to cook turkey using a slow cook method that will keep it moist and delicious.
The Basics
#1: Correct Oven Temperature
Making sure that your oven is accurate is very important for all of your baking, whether it's Thanksgiving or not. This is an easy fix. Simply preheat your oven to 250F degrees and place a cooking thermometer (the same one you'll be testing your turkey with) in the oven. Wait 10-15 minutes and read the results. If it reads 250F degrees you are good! If not, adjust the temp of your oven up or down in accordance with the thermometer.
#2: Safely Thawed & Cleaned
Another important step. Not allowing your turkey to completely thaw can create a dry turkey. The excess pockets of frozen moisture boils inside the bird and creates over cooked areas, drying out the turkey. The only safe way to thaw a turkey is to place it in the refrigerator. Other methods such as running cold water over it or placing it in a microwave oven are not safe because of the chance of bacterial growth and contamination. So, because of that risk I will only give you guidelines using the refrigerator method.
Time Required to Thaw a Turkey
8 to 12 lbs. 2 to 3 Days
13 to 16 lbs. 3 to 4 Days
17 to 20 lbs. 4 to 5 Days
21 to 24 lbs. 5 to 6 Days
#3: Remove the Neck & Giblets
Time Required to Thaw a Turkey
8 to 12 lbs. 2 to 3 Days
13 to 16 lbs. 3 to 4 Days
17 to 20 lbs. 4 to 5 Days
21 to 24 lbs. 5 to 6 Days
#3: Remove the Neck & Giblets
Don't laugh. I have already received comments, questions & emails about this very subject. Yes, there is a plastic or wax paper bag inside your turkey. Yes, you need to remove it. No, I don't eat them, but that's simply your choice.
#4: Know Your Turkey's Weight
#4: Know Your Turkey's Weight
When a turkey is weighed at the grocery store, they are frozen and contain the giblets and neck. Once thawed and washed a good majority of the frozen "turkey juices" are thawed and washed away and although the giblets and neck are small, they are still added weight to your turkey. Yes, sometimes you actually pay for a couple pounds of ice! So, cooking your turkey only by poundage can get you into dry-turkey country! After rinsing your completely thawed turkey and removing the giblets and neck, weigh your turkey. Two simple ways - 1) Use a kitchen scale 2) Get out the bathroom scale. Weigh yourself without the turkey. Then grab the turkey and weigh yourself again. The difference in weight is the weight of the turkey. TADA!!
The Cooking
Step 1: Remove your turkey from the refrigerator 1 hour before you plan to begin cooking. This gives the turkey time to reach room temperature. Sticking the turkey in directly from the fridge can delay your cooking times.
Step 2: Preheat the oven to 475°F. This is not a typo!
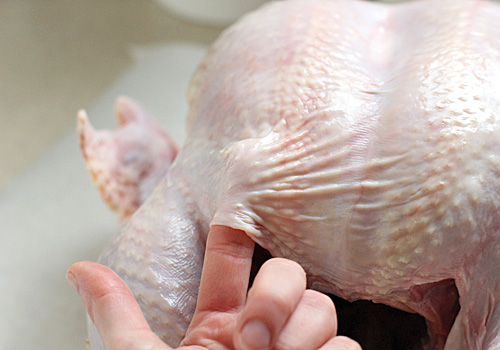 Step 3: Melt 3 tbsp of butter. You just want enough to put a light coating on the breast of the bird. Now that part some people find a bit gross, but essential. Gently separate the skin from the breast but don't remove it. You just want to be able to get your hand between the skin and the breast meat. Rub the melted butter on the turkey breast between the breast skin & meat. You can use a rubber glove if need be. Do not rub the butter on the outside of the skin.
Step 4: Herbs. It's important to add some seasoning to your turkey. Otherwise, turkey has to be the most bland tasting meat on the planet. So, see it as a blank canvas and add some flavor. I recommend sticking rosemary and thyme under the breast skin along with the butter. You may use fresh or dried, your choice, but you MUST chop the herbs to release more of the natural flavors and oils. You can even place slices of garlic cloves if you would like to make it more savory.
Step 5: Flavor the Skin. Lightly sprinkle sea salt and fresh ground black pepper on the skin. The salt will make it crisp nicely. What about the stuffing you may ask?! DO NOT STUFF YOUR TURKEY! Stuffing your turkey will ruin your cooking times, may cause bacterial hazards and also dries out the bird.

Step 6: Place your turkey in the roasting pan, breast side up. Tuck the wings under the bird so they do not blacken. With some cooking string or a twisty-tie, tie the legs together. Take a piece of aluminum foil and create a tent over the turkey. Make sure the shiny side faces the turkey and the dull side faces outward. This will hold in moisture and allow the skin to slowly crisp instead of burning. Remove the aluminum foil after 2 hours.

Step 7: Place the turkey in the oven preheated to 475F degrees for 20 minutes. Then turn the heat to 250F degrees. This again is NOT a typo! Don't let anybody tell you that the temperature has to be higher for it to get done. The reason that turkey is so often very dry is that it's overcooked. We want to slow cook the turkey. You do not have to remove the turkey from the oven. Just reduce the heat. Continue cooking the turkey at 250F degrees for 20 minutes for each pound. No basting necessary. You start counting the 20 minutes per pound immediately when you turn the oven down to 250F, not when the oven has cooled down. Keep in mind that every time you open the oven you lose heat. This can drastically change the cooking time if you are a "check the turkey" kind of person. The best way to monitor the progress is with an electronic meat thermometer. You can buy one here at Amazon.com.
I recommend using an Electric Meat Thermometer. You would insert it in the breast or thigh after the oven has cooled to 250F degrees. You just leave it in the turkey because it's designed to withstand the heat in the oven. The actual thermometer just sits on your counter next to the stove. Check it regularly after half way through the cooking time just to make sure the turkey doesn't get done sooner than expected and, conversely, to make sure the bird is fully cooked. Investing in an electronic meat thermometer is money well spent. If you are using an old fashioned meat thermometer, here's a great video on checking the temperature of your turkey. Remember to remove the aluminum foil after 2 hours to allow the skin to crisp & brown.
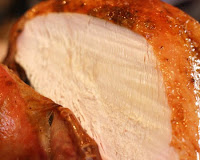
Step 8: Remove the turkey from the oven and allow it to rest uncovered for at least 20 minutes before carving. This allows the juices to redistribute themselves inside the turkey making it even more juicy. Carve & ENJOY!

No comments:
Post a Comment
Thank you for joining the conversation! Jess will be replying soon!