
I don't know about you, but my life is pretty hectic sometimes. A million things can be pulling me in different directions causing me to get in an eating slump pretty dang quick! This last week could have been a prime example. I took a trip to my parents' home in Wisconsin to visit and catch up on some family time. Wisconsin is such a beautiful, wild place. I love to soak up the quiet, peaceful mornings and take them back on the road with me as we travel for work. As many of you know, nothing can set off an eating extravaganza like a mini-vacation. It's the perfect storm for over-indulgence on unhealthy choices. I'm all for vacationing and splurging and treating yourself here and there, but if left unchecked those nasty little choices can become habits when you get home.
Turning a blind eye to all the glorious, golden cheese in Wisconsin, I decided to use my parents' large kitchen to do some veggie prepping and stock-piling healthy foods to bring home with me. My first stop was their local Farmer's Market.
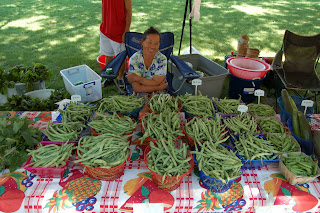 Anyone living in the Minneapolis Metro Area, (Western Wisconsin included) needs to check out their local farmer's markets. Ya'll have these amazing farmers both local Wisconsinites and the beautiful Hmong immigrants. Hmong are immigrant farmers typically from the hills of Laos who were refugees settled in the US after fleeing from the Laotian Civil War. The Hmong people are some of the best farmer's I have ever met. They are kind and generous with their crops and can grow vegetables & fruits in ways not many can. Their produce is just spectacular! So I loaded up on Fingerling Potatoes, Green Beans, Hmong Long Beans, Beets, Purple Onions, Lettuce, Jicama and Cucumbers! And all for such great prices.
I headed back to the house and began trimming my beans, scrubbing my potatoes, boiling the beans and blending my cucumbers. I'll explain more in depth on the cucumbers as I can see you scratching your head and thinking I'm crazy :)
 After trimming my green beans, I blanched them in boiling water until they turned bright green, maybe a minute or two. I pulled them out and plopped them in an ice bath to stop the cooking process. After they had cooled, I packed them in quart sized baggies for the freezer. These green beans come out of the freezer super fresh after thawing and can be eaten with hummus as if they were fresh or added to a number of recipes! I'll list a couple of my favorites below.
 The beets are one of my favorites. (They never used to be!) I trim the top and bottom of each beet, tossing the beet greens as they as look pretty ragged. I plop them in boiling water and let them cook anywhere from 15-40 minutes depending on the diameter of the beets. I try to boil like sizes together so they all get done at the same time. A simple fork test by piercing the beets will tell if they're done. Kinda like a baked potato. I immediately drain them and refill my pot with cold water. I let them sit for 5 minutes to cool so I can handle them. After they've cooled slightly, I begin peeling the rough skin off. Not with a pairing knife, but with my hands alone. By boiling and then cooling the beets, the skin slips off them very easily. After they're peeled, I cube or slice them and pack them into quart sized bags for freezing. Beets thaw VERY well and do not change in texture or taste in the least bit.
 Lastly I began prepping my cucumbers. I'm not a huge fan of cucumbers, but I do love Cucumber Water. Cucumbers are a natural diuretic, meaning they help reduce water weight and help the body flush itself of excess sodium. But they don't keep in the fridge very long, so "stocking up" can be difficult, but I found an easy way. I first peel my cucumbers completely. Peeling them will remove any gritty or tough textures when blending. Then into the Vitamix Blender they go! Once they're liquified I pour them into a ice cube tray and freeze them! With every glass of water I drink, I remove a cucumber puree cube from the freezer and add it to my glass! Fresh Cucumber Water!
With the last of my produce, potatoes, onions and jicama, I simply keep those on the bottom of my refrigerator in the vegetable crisper. Important note: Do not store potatoes and onions together as they encourage spoilage of one another.
Recipes:
Bacon Wrapped Green Beans
Green Beans with Red Pepper and Garlic
Steamed Green Beans with Carrot Dill Dip
Ruby Red Beets & Carrots with Dill
Roasted Beets with Balsamic Glaze
Beet Chips
Turning a blind eye to all the glorious, golden cheese in Wisconsin, I decided to use my parents' large kitchen to do some veggie prepping and stock-piling healthy foods to bring home with me. My first stop was their local Farmer's Market.

I headed back to the house and began trimming my beans, scrubbing my potatoes, boiling the beans and blending my cucumbers. I'll explain more in depth on the cucumbers as I can see you scratching your head and thinking I'm crazy :)


With the last of my produce, potatoes, onions and jicama, I simply keep those on the bottom of my refrigerator in the vegetable crisper. Important note: Do not store potatoes and onions together as they encourage spoilage of one another.
Recipes:
Bacon Wrapped Green Beans
Green Beans with Red Pepper and Garlic
Steamed Green Beans with Carrot Dill Dip
Ruby Red Beets & Carrots with Dill
Roasted Beets with Balsamic Glaze
Beet Chips


