Search Our Recipes & Nutrition Information

Showing posts with label Main Dishes. Show all posts

Chicken Tortilla Soup

One of my favorite things in the world is Mexican Food! So much so that I married a hispanic man to feed my need for Mexican Food because he's so handsome & sweet :) So when I came across a recipe for Chicken Tortilla Soup, I had to do a recipe makeover!!  I hope you enjoy this recipe as much as I have!

2 tbsp olive oil
1 medium onion
1/2c green beans
2 large carrots
2 stalks celery
1 medium jalapeno
4 cloves garlic
1 lb. chicken breast
6c low sodium chicken broth
1 (14.5 oz.) can diced tomatoes w/chiles
1 tsp oregano
½ tbsp cumin
1 medium lime
½ bunch cilantro, chopped

Dice the onion, green beans, carrots, celery, and jalapeno (scrape the seeds out of the jalapeno before dicing). Mince the garlic. Cook the onion, green beans, carrots, celery, jalapeno, and garlic in olive oil over medium heat for about 5 minutes or until tender.

Add the chicken breast, chicken broth, canned tomatoes with chiles, oregano, and cumin to the pot. Bring the whole pot up to a boil over high heat then reduce the heat to low, place a lid on top, and let simmer for one hour.

After simmering for an hour with a lid on, carefully remove the chicken breast from the pot and use two forks to shred the meat. Return the meat to the pot. Squeeze the juice of one lime into the soup. Get as much juice as possible from the lime by using a spoon to scrape the inside of the lime.
Rinse the cilantro and then roughly chop the leaves. Add to the pot, give it a quick stir, and serve.

Family Recipe: Baked Swedish Meatballs

The last several weeks I have been doing some genealogy research on my family and came across some cool information dating all the way back to the 1700's.  Tracing my ancestry back to Germany, Sweden and Norway, I found my mouth watering for my Grandmother's Swedish Meatballs!  With my diet restrictions in mind (dairy & gluten free) I decided to conquer her recipe while substituting my healthier options when necessary. To my surprise they turned out AMAZING!!  I really enjoy them with roasted veggies like carrots, asparagus and a few fingerling potatoes.  I hope that you enjoy the warmth of my favorite family comfort food as much as I have.

*Recipe Note: It's important to use 80/20 ground beef when making meatballs so they don't get dried out. We will be baking them on a rack to allow excess fat to drip off.)

Baked Swedish Meatballs

3 slices of gluten free bread (I use Udi's)
1/2c unsweetened almond milk
1 small onion, chopped
2-3 cloves garlic, chopped
3 tbsp butter, divided
2 large eggs
handful of fresh parsley, chopped (you can use dried herbs too)
2 pounds grass-fed ground beef
salt & pepper to taste

In a large bowl, break apart the gluten free bread into large pieces.  Add almond milk and toss to coat. Set aside.

In a medium saucepan, saute onions and butter until translucent, about 4 minutes. Add chopped garlic and cook 2 minutes. 

Drain off excess almond milk from bread.  Add sauteed onions and garlic to bread.  Stir, then add eggs, parsley and salt & pepper.  With a handheld mixer, mix ingredients on low-med until well combined.  Add ground beef and continue mixing with handheld mixer until all ingredients are well combined.

Preheat oven to 400F. With a spoon, scoop mixture into your hands and roll all remaining mixture into meatballs.  Place meatballs on a rack that fits into a baking pan.  Place meatballs in the oven and bake 20 minutes or until no longer pink inside.

Remove from oven and serve or refrigerate for up to 5 days.  These meatballs also freeze really well!

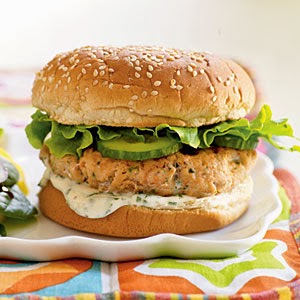
Mexican Salmon Burgers

Cilantro Lime Mayo
1/4c olive oil mayo
1 tbsp cilantro, chopped
1 tbsp fresh lime juice
1/8 tsp salt
1/8 tsp black pepper

Combine mayo ingredients in a small bowl; cover and chill.

Burgers
1 lb salmon fillet, skinned & chopped
1/4c gluten free breadcrumbs (I use glutino brand)
2 tbsp fresh cilantro
2 tbsp chopped green onion
1 tbsp chopped jalapeño or serrano pepper
2 tbsp fresh lime juice
                                                                                 1/2 tsp salt
                                                                                 1/4 tsp freshly ground black pepper
                                                                                 olive oil spray

Place salmon, breadcrumbs, cilantro, onion, peppers, lime juice, salt and pepper in a food processor; pulse until well blended. Divide salmon mixture into 4 equal portions, shaping each into a 3/4-inch-thick patty.
Heat a grill or pan over medium-high heat. Spritz pan or grill with olive oil spray. Add patties; cook 2 minutes. Carefully turn patties over; cook 2 minutes or until done.
Spread about 1 tablespoon mayonnaise mixture over bottom half of each gluten free hamburger bun. Top each serving with 1 salmon patty, and whatever fixin's you like. I enjoy spinach, onion slices, tomato and pickle slices. Enjoy :)

Cheddar Jalapeno Chicken Burgers with Guacamole


1 1/2 pounds ground chicken
1/2c finely chopped yellow onion
1/4c finely chopped fresh cilantro
2 garlic cloves, finely chopped
2 tsp chopped jalapeño
1 tsp ground cumin
1 tsp paprika
1/3c finely shredded cheddar cheese
kosher salt and freshly cracked black pepper

Prepare an indoor or outdoor grill over medium heat.  Transfer the ground chicken to a medium bowl. Add in the onion, cilantro, garlic, jalapeño, cumin, paprika, cheddar cheese, salt and freshly cracked black pepper. Using your hands, incorporate everything together. Make sure everything is evenly incorporated without over mixing the ground chicken. Form the mixture into four 1/2"-thick patties. Grill burgers over medium heat until cooked through, 5-7 minutes per side.

Serve each patty in a burger bun topped with guacamole and sour cream and salsa if desired.

Turkey & Wild Rice Casserole

6c water
Salt to taste
3c uncooked wild rice blend
2 bay leaves
3 tblsp olive oil, divided
1/2c chopped onions
2 tblsp wheat flour (or gf flour)
1 1/2c chicken broth, hot
Ground nutmeg to taste
Pepper to taste
2/3 lb yellow squash, grated (with skin & seeds)
1/2 lb cooked turkey, shredded
1/2c dried cranberries
1/2c finely chopped walnuts
2 tblsp chopped mixed herbs (such as sage, thyme, rosemary or oregano)

Preheat oven to 400°F. Lightly oil a 9- x 13-inch casserole dish; set aside.

Bring 6 cups salted water to a boil in a medium pot. Add rice and bay leaves and stir briefly; bring to a boil. Reduce heat to medium low, cover and simmer, stirring occasionally, until liquid is absorbed and rice is cooked through, about 40 minutes. Remove and discard bay leaves; fluff rice with a fork.

Meanwhile, heat 2 tablespoons of the oil in a small saucepan over medium heat. Add onions and cook, stirring occasionally, until soft and translucent, 4 to 5 minutes. Stir in flour and cook, stirring constantly, for 2 minutes more. Whisk in broth and bring to a boil. Reduce heat to medium low and simmer, stirring occasionally, until thickened, about 20 minutes. Season with nutmeg, salt and pepper; set sauce aside.

Heat remaining olive oil in a large skillet over medium high heat. Add squash, salt and pepper and cook, stirring occasionally, until softened, 5 to 7 minutes; transfer to a large bowl. Add reserved cooked rice, sauce and squash and toss to combine. Add turkey, cranberries, walnuts, herbs, salt and pepper and toss again, just until combined. Transfer rice mixture to prepared dish and bake until hot throughout and just golden brown on top, 20 to 30 minutes.


Quick & Easy Veggie Chili


Make this simple yet tasty recipe and enjoy for dinner or for lunches throughout the week. Substitute black beans or pinto beans or use a combination of your favorite. Note that this recipe makes a small batch, so double it if you want leftovers.

1/2 medium yellow onion, chopped
1/2 large green bell pepper, chopped
3 cloves garlic, finely chopped
2c low-sodium vegetable broth, divided
2 tsp no-salt-added chili powder
2 (15 oz) cans no-salt added kidney beans, rinsed and drained
1 (15 oz) can no-salt-added diced tomatoes
1/4 tsp ground black pepper
1/4c chopped cilantro (optional)
Sliced fresh jalapeño peppers (optional)

Heat a large saucepot over medium-high heat until hot. Add onion, bell pepper and garlic and cook, stirring frequently, about 3 minutes or until beginning to brown and stick to the pan. Stir in 1/2 cup broth and cook 3 to 4 minutes longer or until vegetables are tender and most liquid has evaporated. Stir in chili powder and cook 1 minute, stirring constantly. Add remaining broth, beans and tomatoes and bring to a boil. Reduce heat to medium-low and simmer, partially covered, about 30 minutes or until vegetables and beans are tender and sauce is thickened. Stir in black pepper. Serve with cilantro and jalapeños, if using.


Black-Eyed Pea Nachos


2 tsp expeller-pressed canola oil
1/2 red onion, diced
3 cloves garlic, finely chopped
1 1/2c Black-Eyed Peas
1/4 tsp sea salt
4 oz (about 5 cups) tortilla chips
1c shredded Monterey Jack cheese
1/2c chopped cilantro
1/2 lime
Sriracha sauce to taste

Preheat oven to 450°F. In a medium skillet, heat canola oil over medium-high heat. Add onion and garlic and cook, stirring frequently, until onion is softened, about 5 minutes. Stir in peas and salt and cook 1 more minute. 

Spread chips over the bottom of a 9- x 13-inch baking dish and spoon pea mixture over the top. Sprinkle with cheese and bake just until cheese melts and the nachos are very hot, 8 to 10 minutes. Sprinkle with cilantro and squeeze lime over the top of the nachos. Squirt Sriracha sauce over the top (careful, it's very spicy!) and serve warm.


Goat Cheese Arugula Pizza

1 gluten free pizza crust (I use )
6 tblsp prepared pesto
3 roma tomatoes, sliced thin
1-8oz package of seasoned goat cheese (I use Trader Joe's)
3 cloves garlic, minced
1c fresh arugula
1 tsp olive oil

Preheat oven to 425F degrees.

Dab pesto onto the center of the pizza base, and spread toward the outer edges. Cut the goat cheese into thin coins, and spread or crumble across the pizza. Arrange tomato slices over goat cheese. Sprinkle with garlic. Brush the crust edges lightly with olive oil.

Place pizza directly on preheated oven rack. Bake for 10 minutes, or until the crust edges are golden.
After taking pizza out of the oven, allow to cool for a few minutes so that the cheese has time to set. After a couple of minutes, cover the pizza with a few handfuls of arugula.


Roasted Salmon Stuffed with Spinach, Feta & Ricotta


Salmon fillet stuffed with spinach, ricotta and feta cheese and flavored with Dijon mustard, fresh dill and oregano makes for a scrumptious holiday meal and impressive presentation. For seafood lovers, this savory roast promises to be the start of a new holiday tradition.

1 (2-pound) center-cut boneless, skinless salmon fillet
1 cup ricotta cheese
1 cup crumbled feta cheese
Salt and pepper, to taste
1 tablespoon Dijon mustard
1 cup packed baby spinach, divided
Extra virgin olive oil
Chopped dill
Chopped oregano

Preheat oven to 450°F.

Butterfly salmon fillet through the center so that it lays open flat in one large piece like a book. Turn salmon over so gray underside is facing up and arrange on a clean work surface. In a bowl, mash together ricotta and feta until well blended then season with salt and pepper. 

Season salmon with salt and pepper then spread fillet with mustard and arrange half of the spinach over the top, leaving a 1-inch border around the edges. Evenly spread cheese mixture on top of spinach then top with remaining spinach. Starting from one of the long sides, gently roll up salmon and tie snugly with cooking twine at 1-inch intervals. 

Gently transfer salmon to a greased baking sheet then brush top and sides with oil and season outside with salt and pepper. Scatter dill and oregano over the top and sides and roast until just cooked through, about 20 minutes. Set aside to let rest for 5 minutes then carefully transfer to a serving platter, remove and discard twine and serve.

Nutritional Info:
PER SERVING:340 calories (180 from fat), 20g total fat, 8g saturated fat, 120mg cholesterol, 560mg sodium, 3g carbohydrate (0g dietary fiber, 1g sugar), 36g protein

Chicken Kabobs with Feta-Cucumber Salsa


Cucumbers and tangy feta cheese make a refreshing accompaniment to garlicky grilled chicken. Chunks of firm fish such as swordfish or salmon can be substituted for the chicken if you like.

2 1/2 pounds boneless skinless chicken breast, cut into 1-inch chunks
4 cloves garlic, finely chopped
1/2 teaspoon freshly ground black pepper
3 tablespoons extra-virgin olive oil, divided
3/4 teaspoon coarse sea salt, divided
1 lemon, juice and zest, divided
1 large cucumber, peeled and roughly chopped
1/4 pound (about 1 cup) crumbled feta cheese
1/3 cup finely diced red onion
1/4 cup finely chopped fresh parsley

In a large bowl, combine chicken, garlic, pepper, 2 tablespoons oil, 1/2 teaspoon salt and all but 1 tablespoon of lemon juice and toss to coat. Marinate at least 20 minutes or up to 8 hours.

Meanwhile, place cucumbers in a food processor and pulse until finely chopped but not pureed. Transfer to a bowl and stir in feta, onion, parsley, lemon zest, remaining 1 tablespoon lemon juice, remaining 1 tablespoon oil and remaining 1/4 teaspoon salt. Cover and refrigerate up to 8 hours; bring to room temperature before serving.

Prepare grill for medium-high-heat cooking. Thread chicken on metal (or well-soaked wood or bamboo) skewers and grill, turning frequently, until browned and cooked through, 6 to 8 minutes. Remove chicken from skewers, place on a platter and spoon feta-cucumber relish over top.

Nutritional Info:
PER SERVING:330 calories (120 from fat), 14g total fat, 4g saturated fat, 115mg cholesterol, 620mg sodium, 5g carbohydrate (1g dietary fiber, 2g sugar), 43g protein

Mini Turkey Meatloaf & Maple Green Beans - Sheet Pan Dinner!


Ground turkey, shredded sweet potatoes and tangy barbeque sauce make short order of comforting, homemade meatloaf. Roasting the maple-spiked green beans on the same sheet tray makes prep and clean-up a cinch.

2 teaspoons 365 Everyday Value Extra-Virgin Olive Oil, plus more for oiling pan
1 pound ground turkey breast
1/2 cup finely chopped yellow onion
1 cup grated sweet potato
1/4 cup barbeque sauce, divided
1 3/4 teaspoon fine sea salt, divided
1/2 teaspoon ground black pepper, divided
1 pound green beans, trimmed
1 tablespoon 365 Everyday Value Organic Maple Syrup

Preheat oven to 400°F. Lightly oil a large sheet tray. In a bowl, mix turkey, onion, sweet potato, 3 tablespoons barbeque sauce, 1 teaspoon salt and 1/4 teaspoon pepper. Form into four loaves, brush with remaining 1 tablespoon barbecue sauce and bake on sheet tray for 20 minutes.

In a large bowl, toss green beans with maple syrup, oil and remaining 1/2 teaspoon salt and 1/4 teaspoon pepper. Arrange on sheet tray next to meatloaves and roast until tender and meatloaves are cooked through (165°F), 20 to 25 minutes more.

Nutritional Info:
PER SERVING:290 calories (100 from fat), 11g total fat, 2.5g saturated fat, 80mg cholesterol,1120mg sodium, 24g carbohydrate (6g dietary fiber, 13g sugar), 25g protein


How to Cook the Perfect Turkey

Last year I had the pleasure of making my first Thanksgiving Turkey! I have cooked many a bird, but on Thanksgiving Day, well that's allot of pressure!!  Thanks mom for doing it for almost 30 years!  Since I wanted it to be the BEST Turkey ever on my first shot, I did allot of research and think I've got it down to a science. No dried-out turkey for this family!

With all the pressure on Thanksgiving day, cooking the perfect, juiciest, mouth watering Thanksgiving turkey can be as easy as popping it in the oven and knowing with absolute certainty that at the exact time you plan your meal your turkey will be done. And your turkey will be the most tender, moist and succulent turkey you and your family and guests have ever tasted!

Thanksgiving turkey is now the big hit at our house where before it was always the other great recipes on the table. Why? Because turkey is usually dry. Why? Because they're usually overcooked. Now you'll learn how to cook turkey using a slow cook method that will keep it moist and delicious.

The Basics

#1: Correct Oven Temperature
Making sure that your oven is accurate is very important for all of your baking, whether it's Thanksgiving or not.  This is an easy fix.  Simply preheat your oven to 250F degrees and place a cooking thermometer (the same one you'll be testing your turkey with) in the oven. Wait 10-15 minutes and read the results. If it reads 250F degrees you are good! If not, adjust the temp of your oven up or down in accordance with the thermometer. 

#2: Safely Thawed & Cleaned
Another important step. Not allowing your turkey to completely thaw can create a dry turkey. The excess pockets of frozen moisture boils inside the bird and creates over cooked areas, drying out the turkey.  The only safe way to thaw a turkey is to place it in the refrigerator.  Other methods such as running cold water over it or placing it in a microwave oven are not safe because of the chance of bacterial growth and contamination. So, because of that risk I will only give you guidelines using the refrigerator method.

Time Required to Thaw a Turkey
8 to 12 lbs.       2 to 3 Days
13 to 16 lbs.     3 to 4 Days
17 to 20 lbs.     4 to 5 Days
21 to 24 lbs.     5 to 6 Days

#3: Remove the Neck & Giblets
Don't laugh. I have already received comments, questions & emails about this very subject.  Yes, there is a plastic or wax paper bag inside your turkey. Yes, you need to remove it. No, I don't eat them, but that's simply your choice.

#4: Know Your Turkey's Weight
When a turkey is weighed at the grocery store, they are frozen and contain the giblets and neck.  Once thawed and washed a good majority of the frozen "turkey juices" are thawed and washed away and although the giblets and neck are small, they are still added weight to your turkey.  Yes, sometimes you actually pay for a couple pounds of ice! So, cooking your turkey only by poundage can get you into dry-turkey country!  After rinsing your completely thawed turkey and removing the giblets and neck, weigh your turkey. Two simple ways - 1) Use a kitchen scale 2) Get out the bathroom scale. Weigh yourself without the turkey. Then grab the turkey and weigh yourself again.  The difference in weight is the weight of the turkey. TADA!!

The Cooking

Step 1: Remove your turkey from the refrigerator 1 hour before you plan to begin cooking.  This gives the turkey time to reach room temperature.  Sticking the turkey in directly from the fridge can delay your cooking times.

Step 2: Preheat the oven to 475°F.  This is not a typo! 

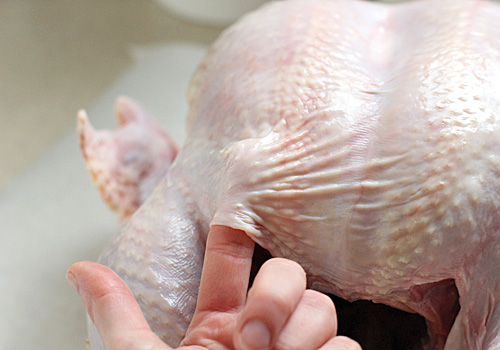
Step 3: Melt 3 tbsp of butter. You just want enough to put a light coating on the breast of the bird.  Now that part some people find a bit gross, but essential.  Gently separate the skin from the breast but don't remove it.  You just want to be able to get your hand between the skin and the breast meat.  Rub the melted butter on the turkey breast between the breast skin & meat.  You can use a rubber glove if need be.  Do not rub the butter on the outside of the skin.


Step 4: Herbs. It's important to add some seasoning to your turkey. Otherwise, turkey has to be the most bland tasting meat on the planet.  So, see it as a blank canvas and add some flavor.  I recommend sticking rosemary and thyme under the breast skin along with the butter.  You may use fresh or dried, your choice, but you MUST chop the herbs to release more of the natural flavors and oils.  You can even place slices of garlic cloves if you would like to make it more savory.  

Step 5: Flavor the Skin.  Lightly sprinkle sea salt and fresh ground black pepper on the skin. The salt will make it crisp nicely.  What about the stuffing you may ask?!  DO NOT STUFF YOUR TURKEY!  Stuffing your turkey will ruin your cooking times, may cause bacterial hazards and also dries out the bird. 

Step 6: Place your turkey in the roasting pan, breast side up.  Tuck the wings under the bird so they do not blacken.  With some cooking string or a twisty-tie, tie the legs together.  Take a piece of aluminum foil and create a tent over the turkey.  Make sure the shiny side faces the turkey and the dull side faces outward.  This will hold in moisture and allow the skin to slowly crisp instead of burning.  Remove the aluminum foil after 2 hours.

Step 7: Place the turkey in the oven preheated to 475F degrees for 20 minutes.  Then turn the heat to 250F degrees.  This again is NOT a typo! Don't let anybody tell you that the temperature has to be higher for it to get done.  The reason that turkey is so often very dry is that it's overcooked.  We want to slow cook the turkey.  You do not have to remove the turkey from the oven.  Just reduce the heat.  Continue cooking the turkey at 250F degrees for 20 minutes for each pound.  No basting necessary.  You start counting the 20 minutes per pound immediately when you turn the oven down to 250F, not when the oven has cooled down.  Keep in mind that every time you open the oven you lose heat.  This can drastically change the cooking time if you are a "check the turkey" kind of person.  The best way to monitor the progress is with an electronic meat thermometer. You can buy one here at Amazon.com.  

I recommend using an Electric Meat Thermometer. You would insert it in the breast or thigh after the oven has cooled to 250F degrees.  You just leave it in the turkey because it's designed to withstand the heat in the oven. The actual thermometer just sits on your counter next to the stove. Check it regularly after half way through the cooking time just to make sure the turkey doesn't get done sooner than expected and, conversely, to make sure the bird is fully cooked. Investing in an electronic meat thermometer is money well spent.  If you are using an old fashioned meat thermometer, here's a great video on checking the temperature of your turkey.  Remember to remove the aluminum foil after 2 hours to allow the skin to crisp & brown.

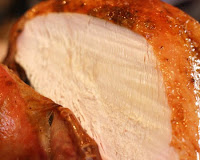
Step 8: Remove the turkey from the oven and allow it to rest uncovered for at least 20 minutes before carving.  This allows the juices to redistribute themselves inside the turkey making it even more juicy. Carve & ENJOY!

Kid's Favorite: Baked Chicken Nuggets

Kid's Favorite: Baked Chicken Nuggets

2 large skinless boneless chicken breasts
2 tsp olive oil
6 tblsp whole grain seasoned breadcrumbs
2 tbsp grated parmesan cheese
1 tsp parsley
salt and pepper to taste
olive oil spray
Preheat oven to 425F Degrees. Spray a baking sheet with olive oil spray.

In a plastic baggie, add the olive oil. Set aside.  Cut the chicken breasts into bite sized pieces, sprinkle with salt and pepper and place in the baggie with olive oil. Roll and shake to coat all chicken pieces with olive oil evenly.  Set aside.

In a mixing bowl, combine the breadcrumbs, parmesan and parsley. Mix well. Place a couple pieces of  chicken in the breadcrumbs at a time.  Coast with mixture and place on the prepared baking sheet.  Bake for 8-10 minutes, then turn and continue baking 4-5 minutes or until cooked through.

Salmon Cakes

Salmon Cakes

1/c Rice Chex
15oz salmon, baked & flaked
1/4c olive oil mayonnaise
2 eggs, beaten
1/4c almond milk
1 tblsp green onion, minced
1/2 tsp agave
2 tblsp whole grain bread crumbs
1 tsp chopped fresh dill
1 tblsp red pepper
1/2 tsp salt
1/2 tsp pepper
1/4c olive oil
lemon wedges

Before beginning, bake your salmon at 400F Degrees until it flakes easily without any deep pink/reddish tones in the center. Set aside to cool slightly, then flake apart.

Pour Chex into a plastic baggie and roll with a rolling pin to crush the cereal.  In a large mixing bowl, combine the crushed cereal, salmon,mayonnaise, eggs, milk, onion, agave, bread crumbs, dill, red pepper, salt and pepper.  Mix well. Cover and refrigerate for 15 minutes.

Form salmon mixture into 8 small patties.  Mixture will be very soft.  In a medium skillet heat olive oil.  Add patties and cook until golden brown on both sides.  Cook 5 minutes more.  Serve immediately with lemon wedges.


Salmon Burgers

Salmon Burgers

1-1/2 lbs skinless, boneless salmon
2 tsp Dijon mustard
2 small shallots, chopped
1/2c whole grain bread crumbs
1/4c chopped parsley
Salt & pepper to taste
1-2 tblsp butter or olive oil
1/3c mayonnaise
Juice of 1/2 lemon
4 soft whole grain hamburger buns

Cut the salmon into large pieces, and combine 1/4 of the pieces with the mustard in a food processor. Process until the mixture becomes pasty, scraping down the sides as necessary. Add the shallots near the end so they are also finely chopped.

Turn out the mixture into a bowl and stir in the breadcrumbs by hand. Season with a healthy pinch of salt and a few grinds of fresh pepper, and shape into four patties.

Heat butter or oil in a large (12-inch) skillet, preferably nonstick, over medium-high heat. Once the skillet is very hot, carefully place the patties inside and cook 2-3 minutes per side, turning once. Alternatively, grill them for the same amount of time, though be careful as the patties are rather fragile.

In the meantime, stir the remaining parsley and the lemon juice into the mayonnaise. Serve with the burgers on a bun or a bed of greens.


BBQ Chicken Wings

BBQ Chicken Wings

4 lbs chicken wings, wing tips removed
1/2c olive oil
4 tsp paprika
3 tsp cumin
2 tsp chili powder
1/2 tsp cayenne pepper (optional)
1/4 tsp black pepper
1/2 tsp sea salt
1/2 lime juiced
1c favorite bbq sauce

Preheat oven to 375°

Begin by breaking down your chicken wings. Cut off the wing tips and toss.  Then make a second cut at the joint, separating the small drum from the wing. You should get 32-40 pieces.

In a small bowl, combine olive oil, paprika, cumin, chili powder, cayenne pepper, black pepper, sea salt & lime juice. Rub the chicken pieces with the spice mixture and let marinate in the refrigerator for 20-25 minutes.

Place wings into a 9×12 baking pan and roast 45 minutes. Remove from oven and place on a hot grill for 2-3 minutes. Remove and toss with bbq sauce. Serve with Organic Blue Cheese Dressing or our Homemade Ranch Dressing!

Herbed Pork Roast

Herbed Pork Roast

2 1/2 lbs boneless pork loin roast
salt & pepper to taste
2 tblsp herbes de provence
1 tsp onion powder
3 garlic cloves, minced
1 tlbsp lemon juice

Preheat oven to 450F degrees.

In a small bowl, add the herbes de provence, onion powder, minced garlic and lemon juice.  Season the roast with salt and pepper.  Then rub the loin with the spice mixture and place in a shallow roasting pan.  Place the roast in the oven and reduce heat to 325F degrees.  Roast 30 minutes per pound or until the internal temperature reaches 165F degrees.  Let the roast sit for 5-10 minutes before slicing. Serve immediately.


Szechuan Beef & Broccoli

Szechuan Beef & Broccoli

1 lb top round steak, sliced thin into strips
1 bag frozen broccoli
1/4c Szechuan or General Tsao's Stir Fry Sauce
1 clove garlic, minced
Olive Oil Mist
Pepper

Mist a large skillet with olive oil over high heat.  Add the broccoli and garlic, stir & cook until the broccoli is crisp-tender and the garlic is soft.  Transfer to a large bowl and cover to keep warm.

Return skillet to heat, mist again with olive oil.  Add the steak strips and cook, stirring occasionally until   steak is lightly browned.  Add the broccoli & garlic mixture and stir fly sauce, stirring to coat the steak and broccoli.  Add pepper to taste and serve.

*You could also use pork tenderloin, chicken, shrimp, tempeh, tofu or just mixed veggies.
**This recipe is only gluten free if your Stir Fry Sauce is Gluten Free.

Bruschetta Ham Frittata

Bruschetta Ham Frittata

3/4c onion, chopped
1/2c green or red bell pepper
1/4c sun-dried tomatoes, chopped
4oz lean ham steak, cut into small cubes
8 eggs, whisked
2oz goat cheese
2 tblsp fresh basil, chopped
salt & pepper to taste

Preheat your broiler.

In a medium bowl, whisk the eggs.

Lightly mist a skillet with olive oil spray over medium heat.  Saute the onion, bell pepper and ham until veggies are tender. Season with salt and pepper.  Pour the whisked eggs over the ham & veggie mixture.  Sprinkle the top with goat cheese and fresh basil.

Transfer the skillet into the oven and broil for 2-5 minutes until the frittata is set and the cheese has melted and browned slightly. Cut into slices and serve immediately. Can be stored in an airtight container for 3-4 days.

Veggie & Chicken Kabobs


Veggie & Chicken* Kabobs

2-3 wood or bamboo skewers, presoaked in water
1 chicken breast, cut into 1 ½-inch cubes
1 green or red bell pepper, sliced into chunks
1 yellow squash, sliced into ¼ to ½-inch-thick rounds
1 zucchini, sliced into ¼ to ½-inch-thick rounds
10 cherry tomatoes
2 tsp extra-virgin olive oil
Sea salt and pepper, to taste

Fill 2-3 skewers with alternating chicken and vegetables.  Drizzle skewers with olive oil and sprinkle with salt and pepper.  Place on hot grill, cook until juices run clear in chicken, and vegetables are tender – approximately 20 minutes

*Chicken can be substituted with other proteins, including steak, salmon, shrimp, and tofu. Please note, this may vary the cooking time.


Related Posts Plugin for WordPress, Blogger...