Search Our Recipes & Nutrition Information

Showing posts with label Vegetarian. Show all posts

Veggie Prep + Fall Veggie Recipes

I don't know about you, but my life is pretty hectic sometimes. A million things can be pulling me in different directions causing me to get in an eating slump pretty dang quick! This last week could have been a prime example.  I took a trip to my parents' home in Wisconsin to visit and catch up on some family time.  Wisconsin is such a beautiful, wild place. I love to soak up the quiet, peaceful mornings and take them back on the road with me as we travel for work.  As many of you know, nothing can set off an eating extravaganza like a mini-vacation. It's the perfect storm for over-indulgence on unhealthy choices. I'm all for vacationing and splurging and treating yourself here and there, but if left unchecked those nasty little choices can become habits when you get home.

Turning a blind eye to all the glorious, golden cheese in Wisconsin, I decided to use my parents' large kitchen to do some veggie prepping and stock-piling healthy foods to bring home with me.  My first stop was their local Farmer's Market.
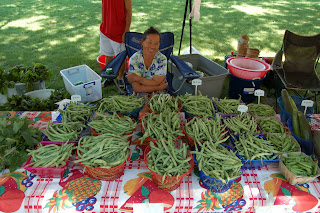
Anyone living in the Minneapolis Metro Area, (Western Wisconsin included) needs to check out their local farmer's markets.  Ya'll have these amazing farmers both local Wisconsinites and the beautiful Hmong immigrants. Hmong are immigrant farmers typically from the hills of Laos who were refugees settled in the US after fleeing from the Laotian Civil War.  The Hmong people are some of the best farmer's I have ever met. They are kind and generous with their crops and can grow vegetables & fruits in ways not many can.  Their produce is just spectacular!  So I loaded up on Fingerling Potatoes, Green Beans, Hmong Long Beans, Beets, Purple Onions, Lettuce, Jicama and Cucumbers! And all for such great prices.

I headed back to the house and began trimming my beans, scrubbing my potatoes, boiling the beans and blending my cucumbers.  I'll explain more in depth on the cucumbers as I can see you scratching your head and thinking I'm crazy :)

After trimming my green beans, I blanched them in boiling water until they turned bright green, maybe a minute or two. I pulled them out and plopped them in an ice bath to stop the cooking process. After they had cooled, I packed them in quart sized baggies for the freezer. These green beans come out of the freezer super fresh after thawing and can be eaten with hummus as if they were fresh or added to a number of recipes! I'll list a couple of my favorites below.


The beets are one of my favorites. (They never used to be!) I trim the top and bottom of each beet, tossing the beet greens as they as look pretty ragged.  I plop them in boiling water and let them cook anywhere from 15-40 minutes depending on the diameter of the beets.  I try to boil like sizes together so they all get done at the same time. A simple fork test by piercing the beets will tell if they're done. Kinda like a baked potato.  I immediately drain them and refill my pot with cold water. I let them sit for 5 minutes to cool so I can handle them. After they've cooled slightly, I begin peeling the rough skin off.  Not with a pairing knife, but with my hands alone. By boiling and then cooling the beets, the skin slips off them very easily.  After they're peeled, I cube or slice them and pack them into quart sized bags for freezing. Beets thaw VERY well and do not change in texture or taste in the least bit.

Lastly I began prepping my cucumbers. I'm not a huge fan of cucumbers, but I do love Cucumber Water. Cucumbers are a natural diuretic, meaning they help reduce water weight and help the body flush itself of excess sodium. But they don't keep in the fridge very long, so "stocking up" can be difficult, but I found an easy way.  I first peel my cucumbers completely.  Peeling them will remove any gritty or tough textures when blending.  Then into the Vitamix Blender they go! Once they're liquified I pour them into a ice cube tray and freeze them! With every glass of water I drink, I remove a cucumber puree cube from the freezer and add it to my glass! Fresh Cucumber Water!

With the last of my produce, potatoes, onions and jicama, I simply keep those on the bottom of my refrigerator in the vegetable crisper. Important note: Do not store potatoes and onions together as they encourage spoilage of one another.

Recipes:
Bacon Wrapped Green Beans
Green Beans with Red Pepper and Garlic
Steamed Green Beans with Carrot Dill Dip

Ruby Red Beets & Carrots with Dill
Roasted Beets with Balsamic Glaze
Beet Chips

Roasted Avocado Tomatillo Salsa Verde

Roasted Avocado Tomatillo Salsa Verde

2 ½ lbs. tomatillos, husked and rinsed
2 large onions
10 cloves garlic
4 jalapeños
2 tbsp. vegetable oil
4 tsp. ground cumin
2 tsp. salt
1c packed cilantro
3 avocados
1 lime (optional)

Preheat the oven to 450 degrees F. Peel and chop the onions into quarters. Place the tomatillos, onions, garlic and jalapeños on a rimmed baking sheet. Drizzle with oil.

Roast in the oven for 15 minutes—until the exteriors are blistered but the insides are still slightly raw.

Meanwhile, half the avocados, remove the seeds, and scoop out the flesh. Cut the jalapeños in half and scrape out the seeds. Discard seeds.

Place HALF of the tomatillos, onions, jalapeños and garlic in a food processor. Pulse until mostly smooth.

Add HALF of the cumin, salt, cilantro and avocado. Pulse until the avocado is pureed into the mixture. Taste for salt.

Repeat with the remaining ingredients. If you desire an extra tart quality, add a bit of lime juice at the end.

Fried Goat Cheese Balls with Peppered Honey

10 oz goat cheese
1/3c all-purpose gluten-free flour
1 tsp kosher salt
1 egg, beaten with a splash of water
1 ¼c gluten-free bread crumbs
¼c honey
¼ tsp hot pepper flakes, finely crushed
Vegetable oil, for frying

Cut the goat cheese into 16 even pieces. Roll into 1-inch sized balls. Place on a baking sheet covered with waxed paper and freeze for 20 minutes. Combine gluten-free flour and salt in a shallow bowl. Place egg and water mixture in another bowl, and the gluten-free bread crumbs in a separate shallow bowl. Set aside. Stir together honey and hot pepper flakes- set aside. In a large saucepan, heat 2 inches of vegetable oil to 375 degrees F. Once the cheese is out of the freezer and is no longer sticky, roll the balls into the flour mixture and shake off excess. Dip into the egg mixture, and then coat evenly in the breadcrumbs. Working in batches, gently drop the coated goat cheese balls into the hot vegetable oil. Fry each ball for about 2 minutes, turning over once after 1 minute. The balls should be golden brown. Remove the balls with a slotted spoon, drain, and place on a plate with paper towel to absorb the excess oil. Once all of the balls have been fried, place on a serving plate and drizzle the spicy honey mixture over the goat cheese. Serve immediately with toothpicks.

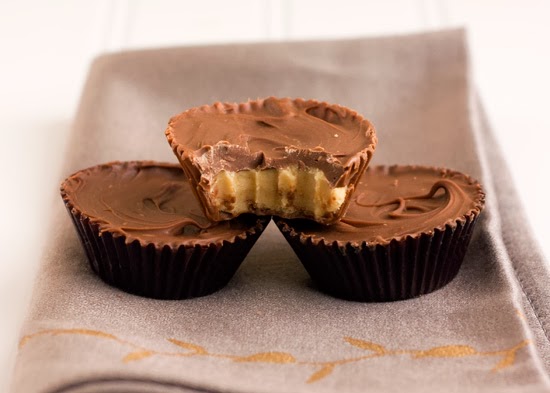
Mini Peanut Butter Cups - No Refined Sugar

1/2c cacao powder
1/4c coconut oil
1/4c pure maple syrup
1/4c all natural, organic peanut butter* (or almond butter or cashew butter)
12 mini cupcake wrappers

Mix cacao powder, coconut oil, and maple syrup in a small bowl until a smooth consistency is formed.
Place a small spoonful of the chocolate into the bottom of the cupcake wrappers.
Add a small scoop of peanut butter to the chocolate and spread evenly.
Top the peanut butter with a small scoop of the chocolate and spread evenly to coat the surface.
Place the mini Peanut Butter Cups in the freezer.
Serve once they are hardened and chilled (about 1 hour).
If you are storing them to eat later, store in the freezer.

Jess - Renew Health Coaching


Coconut Flour Pancakes with Strawberry "Syrup" & Whipped Goat Cheese

My daughter absolutely loves pancakes! And every Saturday morning she gives me this cute little look that screams..."Please mommy, make me pancakes." I on the other hand cannot eat pancakes every Saturday, the same texture, flavors - the same syrups. Ugh! Gotta change it up. I experimented today with using coconut flour instead of my typical oat flour or almond flour and WOW! The flavor was absolutely amazing! Topped with a Low Sugar Strawberry "Syrup" instead of maple syrup and then a zing of Whipped Goat Cheese... Well, this just might be a pancake recipe I can do every week! A recipe like that can't help but be shared! Enjoy!


Coconut Pancakes                                                     Strawberry "Syrup"
4 eggs (best at room temperature)                               1/2 lb of frozen strawberries               
1c almond milk                                                              2 tsp vanilla
2 tsp coconut oil                                                           1 tbsp coconut oil
2 tsp vanilla                                                                   2 packets of SweetLeaf Stevia
2 tsp honey                                                                   1 tsp honey
1/2c coconut flour                                                         1 tbsp ground flaxseed     
1 tsp baking soda                                                      
1/4 tsp sea salt                                                             In a small pot over low heat combine all ingredients.  
1/4 tsp cinnamon                                                          Mash strawberries with fork and cook until thickened 
1/4 tsp cardamom                                                         Remove from heat and serve.
1/4 tsp nutmeg

Preheat griddle over medium heat. In a small bowl, mix your eggs, almond milk, coconut oil, vanilla and honey.

In a medium bowl, combine the coconut flour, baking soda, sea salt, cinnamon, cardamom and nutmeg. Whisk together to combine evenly. Stir in wet ingredients until incorporated.

Test griddle to make sure it's not too hot. Do this by dropping 1-2 drops of water on the surface. If the water "dances" it's too hot. If it sizzles, but does not move around the surface, your griddle is ready.

Spoon a couple tablespoons of batter onto the griddle to make each pancake. You may need to spread them out slightly if the batter is thick. Try to make them small and be very mindful not to burn them (coconut flour browns quickly)

Once the bottoms are slightly browned and the tops look dried out, it's time to flip :) Cook an additional 2-3 minutes.  Top with Strawberry "Syrup" and Whipped Goat Cheese :)

Jess - Renew Health Coaching


Which Nut Milk Is Right For You?

If you’re lactose intolerant, vegan, or would just rather not consume dairy, there are many dairy-free milk options on the market for you to choose from. Each option has its own unique nutrition benefits, flavor, and consistency. 
It can be a bit overwhelming to choose the right milk alternative when you’re at the grocery store, so we’ve taken a closer look at some of the most popular nut and seed milk options. Read below to decide which is the best choice for you!
Soy milk – The most popular of nut milks, soy milk is derived from the soy bean and is packed full of protein. It’s a great alternative to dairy milk on cereal or in coffee because of its neutral flavor. The downfall of soy milk is that it is highly processed, and the benefits of adding soy to your diet are highly debated. 
Rice milk – This is the most hypoallergenic option of all alternative milks. It is also very low in fat and high in niacin and vitamin B6, which are very good for your blood pressure. Rice milk has a sweet flavor, and, like soy milk, many people prefer to use it in cereal, oatmeal or beverages. However, just one cup of rice milk has 33 grams of sugar, which is about 3 to 4 times more than soy milk so it is a good idea to incorporate other milks into your diet as well if you plan to drink rice milk.
Coconut milk – Coconut milk is the richest and creamiest dairy-free milk option. If you buy a can of high fat coconut milk, the texture and consistence is much like heavy cream. However, it can also be purchased in a carton, which tends to have a lower fat content and isn’t as thick. Coconut milk is high in saturated fat, so it’s a great option for more decadent uses like flavoring rice or making curry.
Almond, cashew, and hazelnut milk – There are several varieties of nut milk on the market now. The most common are almond, cashew and hazelnut. Almond milk in particular is high in protein and magnesium, which is good for bone strength. It is also high in vitamin E and has much less sugar than soy or rice milk. Nut milks tend to have a very nutty flavor, so they are a good option to use in vegan baking or cooking.
Hemp milk – This option is great for people with nut or soy allergies. Hemp milk is very high in omega 3 fatty acids and low in saturated fat. It is very creamy and thicker than many nut milks, although it does have a strong nut flavor.
Most of the alternative milks that you can buy at the grocery store are highly processed, and almost all of them, especially flavored versions, have a very high sugar content.  Luckily, many nut milks are easy to make at home. We found this recipe from IIN graduate, Diana Chaplin for almond cashew milk that is simple and easy. Give it a try next time you want to incorporate nut milk into a meal!
Delectable Almond, Cashew Milk
Ingredients
  • 1 ½ cups raw almonds
  • 1 cup raw cashews
  • 2-3 dates
  • 5 cups of water
  • 1 tsp. vanilla extract
  • 1-2 cinnamon sticks
Instructions
  1. Rinse and soak the almonds, cashews, dates overnight.
  2. After about 8 hours, drain the water and rinse again, then put the mix in a blender with 5 cups of water (divide into two batches if necessary).
  3. Blend until the mixture is thoroughly white and just a little frothy.
  4. Strain the pulp and transfer to a large container.
  5. Add the vanilla extract, and the cinnamon sticks (I like to store my almond milk in 16oz jars and put one cinnamon stick in each jar for a few hours before removing it).
  6. Give it a taste, and if you could use a bit more sweetness add a couple drops of liquid stevia or maple syrup.
What is your favorite alternative milk?

16 Healthier Ways to Make Chips

Allegedly, once you pop you can’t stop. Since it’s usually game over once that bag opens, we’ve rounded up a list of crunchy, customizable chip-like substitutes. They’re healthier, and most importantly, still tasty. Most can be made gluten-free, and with a whole lot less salt than store-bought ’tater versions. All it takes is some slicing, rubbing in oil, baking, and our favorite part — munching.
5 Pro Tips (for all Chip Varieties)
  • Use a mandoline — a cooking utensil that can pump out uniform, thin slices — or a chef’s knife to cut slices 1/8 — 1/4 of an inch thick. It’s important to get the chips thin to get just the right crisp.
  • When placing the chips on a baking sheet, line the sheet with parchment paper and lay the chips in a single layer. If the chips overlap, the edges won’t cook evenly.
  • For even cooking, rotate the pan halfway through and flip the chips.
  • For small batches, pop the chip subs in a toaster oven.
  • Store leftovers in an airtight container, though most of these won’t stay at their peak crunchiness for long (more reason to eat ’em right up).
KaleKale is a distant cousin of broccoli and is known to have a very large amount of antioxidants compared to other fruits and veggies. Since kale can sometimes be a little bitter, try gently massaging the leaves with a little olive oil before baking. Add nutritional yeast (a vegan powder loaded with nutrients) to these lightly crunchy snacks for a cheesy taste. Or dust with Parmesan for the real McCoy. For a flat chip, use dinosaur kale. The alternative, curly kale, is much more textured but also makes a tasty chip that hangs onto dips and toppings better.
DIY: Preheat oven to 375. Rinse and dry 1 large bunch of kale, then remove the stems and tough center ribs. Rip the kale into large pieces, toss with a little olive oil, then sprinkle with some salt and pepper. Bake until crisp, about 10 to 15 minutes, checking frequently. (They can burn easily!)
CarrotFor lots of beta-carrot-ene (see what we did there?!), which converts into vitamin A in the body, munch on these orange veggie chips. Sprinkle with cinnamon, nutmeg, and a splash of OJ before popping them in the oven.
DIY: Preheat oven to 250 and bake for 45 minutes, or until crispy.
TurnipTurnips, which look like white beets with pretty purple stems, are a great source of vitamin B6, which helps to produce serotonin, the hormone that helps us sleep and control appetite. If you’d rather not peel them, make sure to give them a good scrub before the chips hit the baking sheet.
DIY: Preheat oven to 375. Roast for 20-25 minutes.
AppleWe don’t need to tell you apples are healthy. (What’s that old saying again? Something about a doctor?) Make them extra autumnal by sprinkling the slices with pumpkin pie spice, or your own mix of cinnamon, ginger, nutmeg, and allspice. We like Bare Fruit’s bake-dried chips. They’re organic with no added sugar, preservatives, or additives, and a single serving has fewer than 30 calories.
DIY: Preheat oven to 200, bake for one hour, flip, and cook for another hour.
BeetBeets have a ton of antioxidant betalain, known for its anti-inflammatory and detoxification powers. Slicing the roots and baking them produces a deep purple chip that’s sweet from natural sugars (or a golden yellow if made with golden beets). For a sweet and savory combination, top them with a dollop of goat cheese.
DIY: Preheat oven to 350, and bake 20 minutes. Rotate sheet and bake 10-20 more minutes. 
TaroThe taro root looks a bit like a potato, but inside reveals a white flesh with pretty little purple squiggles. Taro is a good source of dietary fiber and vitamin E, which protects essential lipids (naturally occurring molecules that are important for energy storage) in the body. For a full serving of veggies in every ounce, try Terra Chips, which feature taro plus sweet potato, yucca, batata, parsnip, and ruby taro. As far as bagged chip varieties go, these have less than half the sodium than standard potato chips.
DIY: Preheat an oven to 400, and bake the rounds for 15 minutes or until edges start to turn golden brown.
Green BeanThese guys manage to sneak in a bit of protein and calcium over their chip counterparts. We love Trader Joe’s lightly salted crunchy Green Beans. They’re sweet and savory at the very same time. Dip ’em in sriracha sauce for some spice!
DIY: Preheat oven to 425 and bake for 15 minutes, or until crunchy and golden brown.
BananaThese chips provide a crunch that satisfies a sweet tooth, especially when dressed up with cinnamon, or dipped in honey-drizzled Greek yogurt. And though bananas are mainly recognized for their potassium levels, they’re also a great source of vitamins C and B6. We like Funky Monkey’s bananamon flavor, which are freeze-dried and sprinkled with cinnamon (and only 45 calories for a small package).
DIY: Brush the slices with lemon juice to avoid major browning. Preheat oven to 175-200. Bake for 1½ hours. While they may be a little gooey when you take them out of the oven, they’ll harden a bit as they cool.
Butternut SquashThese are the biggest of all the chips in the land. They’re sweet, taste pumpkin-y, and you get two fun shapes out of one squash. The seedless part up top yields sizeable rounds, while the bottom part (once de-seeded and sliced) makes rings. Sweeten ’em up with a touch of maple syrup or brown sugar.
DIY: Preheat oven to 375 and bake for 20 minutes, flip and cook until brown on the edges.
Sweet PotatoFor a vitamin-A-packed snack, try slicing up bright orange sweet potatoes instead of the white ones. Brush them with olive oil, and top with minced garlic, minced rosemary, and a little sea salt for chips that rival the store bought kind. For a quick fix, try Food Should Taste Good sweet potato chips, for 2 extra grams of fiber per serving compared to regular potato chips.
DIY: Preheat oven to 400 and bake for 20-25 minutes, or until crispy.
ZucchiniThis green veggie is a solid source of niacin and thiamine, two B vitamins that help us produce healthy hair and skin. Try dipping them in egg whites, then coating them in Parmesan, black pepper, and breadcrumbs or cornmeal for extra flavor and crunch.
DIY: Preheat oven to 450. Bake for 8-10 minutes, flip slices, then roast for another 8-10 minutes.
RadishBear with these little guys. We know it’ll take a little more patience to slice ’em up, but they’re a good source of riboflavin (which helps convert food to fuel) and copper (important for our immunity). Dust these little rounds with curry, turmeric, garlic, paprika, and pepper for a super-flavorful treat.
DIY: Preheat oven to 350, roast for 15 minutes, flip and cook for another 15.
Whole Wheat TortillaThese aren’t made from sliced fruits or veggies, but they’re an incredibly simple, semi-homemade snack, and a blank canvas for all sorts of flavor combos. Grab your favorite whole-wheat wrap (we like Flatout) and slice them into wedges with a pizza cutter before tossing them in the oven. These can hold up during some serious dipping!
DIY: Preheat oven to 350, and bake wedges for 10-15 minutes.
PitaStacy’s pita chips and crisps come in a ton of flavors, like “perfectly thymed” and cinnamon sugar. It takes 14 hours to whip up a batch of the delicious, definitely dippable chips so we’re glad we don’t have to do it!
HummusSimply 7 hummus chips are made with chickpea flour (you know, the cute little beans that make hummus) and no hard-to-pronounce ingredients.
SoyFor a sweet and smoky variety, try Glenny’s barbeque soy crisps. They’re made with organic soy and organic rice flour (gluten-free!), and a single serving provides seven grams of protein.
Did we miss any of your favorite chip alternatives? Which are you baking up first? Let us know in the comment section below.

Beet Greens with Caramelized Onions

1 tblsp olive oil
1/4 lb yellow onion, diced
1/8 tsp fresh thyme
1/8 tsp fresh rosemary
1 garlic clove, minced
1/8 tsp salt
fresh black pepper
1/8c balsamic vinegar
4c beet leaves, washed and chopped

Heat the oil over medium high heat till it stops sizzling.  Add onions and reduce the heat to medium-low.  Cook slowly, stirring occasionally, until golden brown and caramelized, about 30 minutes.  Add the thyme, rosemary, garlic, salt, and pepper, and vinegar stir well to combine.  Cook for 5-15 more minute.  Add beet greens just to wilt.

Baked Quinoa Zucchini Chips with Sriracha Sauce


Quinoa Baked Zucchini Chips with Sriracha Dipping Sauce
  • 1 large zucchini, sliced into ¼ inch thick rounds
  • 2/3 cup almond milk (or milk of choice)
  • 1 tablespoon lemon juice
  • ½ cup toasted Quinoa Flour (see note)
  • ¾ cup Quinoa Flakes
  • ½ cup crumbled rice crackers OR panko breadrumbs
  • 1 teaspoon garlic powder
  • 1 teaspoon onion powder
  • 1 teaspoon smoked paprika
  • ½ teaspoon sea salt
  • ½ teaspoon fresh cracked black pepper
  • Olive oil spray

  • Sriracha Dipping Sauce
  • 1/3 cup tofu mayo or Greek Yogurt
  • 1 – 3 teaspoons Siracha (to taste)
  • 1 tablespoon fresh lime juice
  • 3 cloves minced garlic
  1. Preheat oven to 425. Place a wire rack on top of a baking sheet.
  2. Combine almond milk and lemon juice and set aside.
  3. Place quinoa flour, quinoa flakes, rice crackers, garlic powder, onion powder, smoked paprika, sea salt and black pepper in a food processor. Pulse until smooth.
  4. Dredge zucchini wedges in quinoa and cracker mixture. (Only a little bit will stick) Dip in milk mixture and then recoat with the quinoa mixture. Spray or brush with olive oil. Place on wire rack and bake for 20 to 25 minutes, until golden brown. If desired, serve with Sriracha Dipping Sauce
  5. For the dipping sauce: Combine all ingredients in a small bowl and mix until well combined. Store in the refrigerator until chilled.
Never toasted quinoa flour? It’s really simple but completely optional. I do it because I love the nutty and less earthy taste that it brings out. All you need to do is line a baking sheet with parchment paper and spread the flour out to about 1/4 inch deep. (I do a box at a time.) Bake on 220 degrees for 2 1/2 hours. Allow to cool completely and then store in a sealed container in the refrigerator or freezer.

Thank you CookingQuinoa.net for this great recipe!! - Jessie

Grajeda Family Salsa

8 cloves garlic (leave skin/paper on)
1/2 lb onion
1/2 lb jalapeno or sorreno peppers
4 lbs hot house tomatoes
2 lbs tomatillos
1 bunch cilantro
3 tblsp tomato paste
1/2 tsp cumin
salt to taste

Preheat oven to 500F degrees.

Line a baking sheet with aluminum foil. Arrange garlic, onion, peppers, tomatoes and tomatillos on the baking sheet. (DO NOT REMOVE GARLIC PAPER) This will prevent the garlic cloves from burning and becoming bitter.

Place in oven until the skins of the red tomatoes break and begin to peel back. Remove skins/papers of the garlic. Place all roasted ingredients & cilantro into the food processor. Process until slightly chunky. Add tomato paste, cumin & salt. Process again. (DO NOT OVER-PROCESS or your salsa will get runny.)

Serve warm or refrigerate up to 2 weeks. I have froze this salsa many times and it defrosts nicely! :) Enjoy!!!

Oat & Nut Muesli

2c old fashioned oats
grated zest 2 oranges
1/4c orange juice
1/2c unsweetened shredded coconut
1 tsp cinnamon
3 tblsp slivered almonds
3 tlbsp sunflower seeds
3 tblsp sesame seeds
3 tblsp flaxseeds
3 tblsp amaranth puffs
3/4c dried currants, chopped dried apricots or dried cranberries


Preheat oven to 400F. Cover a baking sheet with parchment paper.  Pour the oats on the pan in a line. Top with zest and orange juice. Next pour the coconut in a line and sprinkle with cinnamon. Continuing this stripe pattern, add the nuts and seeds.  Bake for 10 minutes until lightly golden. Remove from oven and place in glass bowl. Toss with amaranth puffs and dired fruit.

Muesli can be stored for several weeks in an airtight container in the refrigerator. Refrigeration is needed to prevent the nuts and seeds from becoming rancid.

Flourless Chocolate Chip Blondies

I wish I could take credit for this recipe because quite frankly...it's amazing! Thank you to Monique at Ambitious Kitchen for this remarkable recipe! I have fallen in love with MANY of her dessert recipes. Gluten free baking is tricky business and I don't like to mess with perfection. Try out her Black Bean Avocado Brownies too...delicious!

Now to the Blondies! I'll post the recipe here, but please visit her website and check out her recipes and photos!

Flourless Chocolate Chip Chickpea Blondies with Sea Salt

olive oil spray
1 can (15 oz) chickpeas, rinsed and drained
1/2 cup all natural almond butter or peanut butter
1/3 cup pure maple syrup or agave nectar (you can also use honey if you’re not vegan)
2 teaspoons vanilla
1/2 tsp salt
1/4 teaspoon baking powder
1/4 teaspoon baking soda
1/3 cup vegan (or regular) chocolate chips plus 2 tablespoons
sea salt, for sprinkling

Preheat oven to 350 degrees F and spray 8×8 inch pan with nonstick cooking spray.

In a food processor, add all ingredients except chocolate chips and process until batter is smooth. Fold in 1/3 cup of chocolate chips, I like to use dark chocolate because it has less sugar but it’s up to you. Note: Batter will be thick and super delicious, so you could actually just eat it on it’s own! (no eggs!)

Spread batter evenly in prepared pan then sprinkle 2 tablespoons of chocolate chips on top. (The batter may stick to your spatula, so I like to spray my spatula with nonstick cooking spray first.) Bake for 20-25 minutes or until toothpick comes out clean and edges are a tiny bit brown. The batter may look underdone, but you don’t want them to dry out!

Cool pan for 20 minutes on wire rack. Sprinkle with sea salt then cut into squares. Makes 16 blondies.

For variations and nutrition information, visit the Ambitious Kitchen website.

Crunchy Bok Choy Slaw

1/4c rice vinegar
1 tblsp toasted sesame oil
1 tsp agave
2 tsp Dijon mustard
1/4 tsp salt
6c bok choy, very thinly sliced
2 medium carrots, peeled and shredded
2 scallions, thinly sliced
1 tsp sesame seeds

Whisk vinegar, oil, agave, mustard and salt in a large bowl until the agave dissolves. Add bok choy, carrots and scallions.  Toss to coat with the dressing. Sprinkle with sesame seeds.


Vegetable & Brown Rice Soup

1 tblsp olive oil
1 medium onion, chopped
10 shitake mushrooms, sliced
2 green onions, chopped
5 carrots, chopped
10 small red potatoes, chopped
1 tblsp parsley
1 tblsp basil
1 tsp salt
1/2 tsp pepper
1 tblsp  + 2 tsp tomato bouillon
5 cups water
1 (12 oz) jar roasted red peppers
1c TVP (textured vegetable protein)
1c beef broth
2c brown rice, cooked

In a large pot on medium-high heat, add the olive oil, onions, mushrooms and green onions.  Saute until onions are tender.  Add chopped carrots, red potatoes, parsley, basil, salt and pepper.  Continue to saute for 4-5 minutes.  Add the tomato bouillon and water.  Bring to a boil, then reduce heat to a simmer.

In a medium mixing bowl, add the TVP.  In a glass measuring cup, bring the beef broth to a boil in the microwave.  Pour the boiling beef broth unto the TVP and stir just to combine.  Allow the TVP to sit for 5 minutes until all the beef broth has been absorbed.

Add the moist TVP and the cooked brown rice to the large pot and continue to simmer until the potatoes and carrots are tender.  Serve immediately :)


Quick & Easy Veggie Chili


Make this simple yet tasty recipe and enjoy for dinner or for lunches throughout the week. Substitute black beans or pinto beans or use a combination of your favorite. Note that this recipe makes a small batch, so double it if you want leftovers.

1/2 medium yellow onion, chopped
1/2 large green bell pepper, chopped
3 cloves garlic, finely chopped
2c low-sodium vegetable broth, divided
2 tsp no-salt-added chili powder
2 (15 oz) cans no-salt added kidney beans, rinsed and drained
1 (15 oz) can no-salt-added diced tomatoes
1/4 tsp ground black pepper
1/4c chopped cilantro (optional)
Sliced fresh jalapeño peppers (optional)

Heat a large saucepot over medium-high heat until hot. Add onion, bell pepper and garlic and cook, stirring frequently, about 3 minutes or until beginning to brown and stick to the pan. Stir in 1/2 cup broth and cook 3 to 4 minutes longer or until vegetables are tender and most liquid has evaporated. Stir in chili powder and cook 1 minute, stirring constantly. Add remaining broth, beans and tomatoes and bring to a boil. Reduce heat to medium-low and simmer, partially covered, about 30 minutes or until vegetables and beans are tender and sauce is thickened. Stir in black pepper. Serve with cilantro and jalapeños, if using.


Black-Eyed Pea Nachos


2 tsp expeller-pressed canola oil
1/2 red onion, diced
3 cloves garlic, finely chopped
1 1/2c Black-Eyed Peas
1/4 tsp sea salt
4 oz (about 5 cups) tortilla chips
1c shredded Monterey Jack cheese
1/2c chopped cilantro
1/2 lime
Sriracha sauce to taste

Preheat oven to 450°F. In a medium skillet, heat canola oil over medium-high heat. Add onion and garlic and cook, stirring frequently, until onion is softened, about 5 minutes. Stir in peas and salt and cook 1 more minute. 

Spread chips over the bottom of a 9- x 13-inch baking dish and spoon pea mixture over the top. Sprinkle with cheese and bake just until cheese melts and the nachos are very hot, 8 to 10 minutes. Sprinkle with cilantro and squeeze lime over the top of the nachos. Squirt Sriracha sauce over the top (careful, it's very spicy!) and serve warm.


Goat Cheese Arugula Pizza

1 gluten free pizza crust (I use )
6 tblsp prepared pesto
3 roma tomatoes, sliced thin
1-8oz package of seasoned goat cheese (I use Trader Joe's)
3 cloves garlic, minced
1c fresh arugula
1 tsp olive oil

Preheat oven to 425F degrees.

Dab pesto onto the center of the pizza base, and spread toward the outer edges. Cut the goat cheese into thin coins, and spread or crumble across the pizza. Arrange tomato slices over goat cheese. Sprinkle with garlic. Brush the crust edges lightly with olive oil.

Place pizza directly on preheated oven rack. Bake for 10 minutes, or until the crust edges are golden.
After taking pizza out of the oven, allow to cool for a few minutes so that the cheese has time to set. After a couple of minutes, cover the pizza with a few handfuls of arugula.


A Sweet & Gluten Free Addition to Your Sunday Brunch


Nothing brings family and friends together quite like a delicious meal. Hosting Sunday brunch is a great way to gather everyone around the table to swap stories, reconnect, relax and enjoy each other’s company. It’s the perfect primary food!
 Add this gluten-free, dairy-free cinnamon sweet potato loaf cake to your next brunch menu for a sweet side dish that your brunch party will love and you’ll feel good about serving.


Cinnamon Sweet Potato Loaf

2c gluten-free all purpose flour such as Bob’s Red Mill
2 1/2 tsp Simply Organic Cinnamon
1 tsp baking soda
1/4 tsp baking powder
1/4 tsp sea salt
1 3/4c stevia for baking such as Stevia in the Raw
3/4c oil
3 large eggs
2 tsp almond extract
8 large sweet potatoes, cooked, peeled and grated
1c finely chopped pecans
2 tblsp coconut flakes

Preheat oven to 350 degrees F.
Prepare a loaf pan with nonstick baking spray.
In a large bowl, combine flour, cinnamon, baking soda, baking powder and sea salt.
In a separate large bowl, beat stevia, oil, eggs and almond extract. Add sweet potato; mix well. Add dry ingredients, pecans and coconut flakes to wet ingredients; mix well.
Transfer batter into prepared baking pan. Bake for 1 hour or until a toothpick inserted in the center comes out clean. Remove from oven; set aside to cool for 10 minutes before serving.


Steamed Green Beans with Carrot Dill Dip


Crisp beans and a savory dip of puréed carrots make a great finger-food starter or an excellent addition to a picnic.

3 medium carrots, peeled and thinly sliced
1 pound green beans or yellow wax beans or a mixture of both, stem ends trimmed
2/3 cup fat free greek yogurt
1/3 cup light mayonnaise
1/2 shallot, roughly chopped
1/2 teaspoon fine sea salt
pinch cayenne pepper
1/4 cup lightly packed chopped fresh dill

Steam carrots until they are very tender, about 10 minutes. Transfer carrots to the bowl of a food processor. Set aside to cool.

Steam green beans until bright green and crisp-tender, 4 to 5 minutes. Immediately cool beans in cold water. Drain and pat dry.

When carrots are cool, add sour cream, mayonnaise, shallot, salt and cayenne to the food processor and process until smooth. Add dill and pulse until combined. Transfer dip to a bowl and serve with green beans for dipping.

Nutritional Info:
PER SERVING:80 calories (40 from fat), 4.5g total fat, 0.5g saturated fat, 10mg cholesterol, 260mg sodium, 10g carbohydrate (3g dietary fiber, 5g sugar), 2g protein

Onion, Bacon & Butternut Tart


The sweet and savory flavors of caramelized onions, bacon and butternut squash make this rustic tart a winner. If you'd like to make it ahead you can refrigerate it whole or in portions and reheat it in a 300°F oven.

All-purpose flour for rolling dough
14 ounces whole wheat pizza dough, thawed if frozen
5 slices thick-cut bacon
1 large onion, halved and thinly sliced
2 cloves garlic, thinly sliced
1/2 teaspoon fine sea salt
1 (10 ounces) package frozen diced butternut squash (1 1/2 cups), thawed
1 1/2 cup (about 6 ounces) grated Fontina or Gruyère cheese
2 teaspoons extra-virgin olive oil, divided
1 tablespoon chopped fresh thyme

On a lightly floured surface with a lightly floured rolling pin, roll dough out to a circle about 14 inches in diameter; if the dough pulls back strongly, stop rolling, cover the dough with a kitchen towel and let rest 10 minutes before continuing. Transfer dough to a round pizza pan, stone or large greased baking sheet; reshape dough as needed, but you can leave any edges of the dough hanging over the sides of the pan (they will be folded in later). Cover with a towel and refrigerate.

Preheat oven to 475°F and place a rack in the middle of the oven. Cook bacon in a large skillet over medium heat until crisped, 8 to 10 minutes. Transfer bacon to a paper-towel-covered plate to drain. Pour off all but 1 tablespoon of grease left in skillet. Return skillet to medium heat and add onion, garlic and salt. Cook, stirring occasionally, until onion is golden and tender, about 15 minutes. Add squash and cook, tossing gently once or twice, until any excess moisture evaporates, 2 to 3 minutes.

Scrape onion mixture into middle of dough and spread evenly, leaving a 1-inch border around edges. Sprinkle top with cheese. Brush edge of dough with half the oil and fold it over to make a ½-inch rim. Brush rim with remaining oil. Bake until tart is deeply browned and dough is cooked through, 20 to 25 minutes. Sprinkle with thyme and cool 10 minutes, then transfer to a cutting board and cut into wedges or squares for serving.

Nutritional Info:
PER SERVING:340 calories (110 from fat), 12g total fat, 6g saturated fat, 35mg cholesterol, 750mg sodium, 41g carbohydrate (7g dietary fiber, 2g sugar), 14g protein
Related Posts Plugin for WordPress, Blogger...